Wednesday 22 December 2010

Research - Ansel Adams

I have chosen to look at Ansel Adams work, via the internet, after hearing that he inspired Joe Cornish.

Ansel Adams lived from 20/2/1902-22/4/1984 and was born in San Francisco, California. At age 4 he obtained a nose injury falling to the ground in The Great Earthquake of 1907 and this gave him his distinctive life long feature.  He felt that he never really fitted in at school, partly due to this injury, and was home taught by his father and aunt before having private education.

"Ansel Adams is the most famous black and white photographer of all time" according to his web site.  He was an only child, had by his mother at age 40, was raised in a Victorian way and had an affluent family history, though in his early years his family fortune collapsed.

                                                              taken by Ansel Adams

This is one of his famous Oak Tree (sunset city) photographs which is great and so atmospheric.  The shape of the tree is lovely, the stillness of the atmosphere comes through, and the way he framed the sun within the arched branches is something I would like to attempt given the opportunity. Though mostly I prefer colour photographs I do think  Black and white look  good and bring out the form.  The scene shows siluette qualities and it makes me want to hunt a similar tree, with light showing from behind the branches.

Ansel Adams had a solitary childhood and found joy in nature, spending hours taking walks, hiking dunes, creeks and beaches in the wilderness of the Golden Gate.

When he was 12 he taught himself to play the piano and read music. He took lessons and it was to be his profession, but then from his first visit to the Yosemite Sierra, he was transformed. He started to use his Kodak No 1 Box Brownie his parents had given him, to photograph scenes there and this was a turning point in his life.

Adams decided he would make more money in photography that being a concert pianist. He hiked, climbed  and explored Yosemite and gained confidence and self esteem in the process.  In 1919 he joined the Sierra club and spent 4 summers as keeper of the clubs memorial lodge in Yosemite Valley.

His life was (in his words) "Coloured and modulated by the great earth gesture of the Yosemite Sierra." and spent time there every year up to his death.
He described himself as a Photographer, lecturer and writer and travelled the country in pursuit of natural beauty to photograph and to promote photography as a fine art.

In 1927 he met friend photographer Edward Weston and later they both became part of the renouned f/64 group ( founded in 1932).  Although this group was short-lived, a San Francisco museum gave them  an exibition and also gave Adams his first one-man museum show in the same year.  The members of the f/64 group believed that everything should be in focus in photography.

Adams tried to portray the emotional side of his images to the viewer. He was a sociable man who liked to entertain and would also work for 18 hours or more a day for weeks or months on end, with no holidays. These times would follow with some days spent in bed with the flu.

He mostly worked as a commercial photographer and struggled with money until later in life.  He was also an activist for the wilderness environment and fought for lots of environmental issues ie. new parks, the Wilderness Act for the preservation of the wilderness,  (in particular Yosemite National Park), Wild Alaska, for the mighty redwoods, endangered sea lions/ otters and for clean air and water...
There is a vast amount of protected wilderness in America due to the efforts of Ansel Adams and his friends.

Adams was master of the technical and developed the famous 'Zone System" of exposure control.  He produced 10 photography manuals, said to be the most influential books ever written on the subject.

I relate to the natural likes he had for natures imagery and find it inspiring that he worked all hours to fulfil his ambitions.

                                                     Trees With Snow On Branches
                                                             taken by Ansel Adams

Ansel Adams took this image in Yosemite California.  I like the way this tree is snow covered with a thickness and the upwardly somewhat irregular branches full of it.  The harsh shadows formed from the brightness are a good contrast bought more to eye because it is all black and white probably. Snow scenes are some of my favourite sort of photography and I also like mountain scenery.

                                                            The Tetons & Snake River
                                                             taken by Ansel Adams

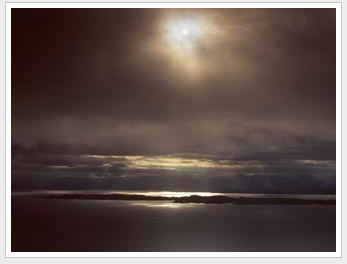
He took this one at Grand Teton National Park, Wyoming and is a scene that appealed to me because of its expanse.  A great waterway leads the eye to the snow mountains and broody skies.  I think the image does look cold because of the black and white and wonder, if it had been in colour whether some greenery or light cast would add some warmth.   I still like it however, as the lack of colour does adds to the mood I think.

Here is an Ansel Adams colour photograph:

                                                        Minarets reflected in Lake Ediza
                                                               taken by Ansel Adams

This image does look warmer to me. I like the scene and the way it has some colour and like their reflections in the lake. It is interesting the way the colour cast shows a pink edging in the water reflection.  The patterns created are affective and  I would compare it to my 'Reflections' image (see composition and images section),  only for a patterns point of view, not of image quality, clarity or composition.  I would love to be able to achieve such clarity.

I was eager to go out in the snow to experiment with the camera over the icy period recently.  Armed with a loaded camera and warm clothes;  jumper layers, jeans, trainers, hat, 2 pairs of socks and fingerless gloves I found  helpful.   I didn't take a tripod on this field trip as not only did I consider it too cold to hang around too long, I didn't want any accidents with the equipment.

Health and Safety (what went right and wrong):

 I would say I was considering health and safety issues here, as stated above, when I had the thought of not carrying too much equipment in hazardous conditions, considering the health and safety of the equipment.   However,  the health and safety thought soon left me, once at my destination... I got carried away, staying too long,  and as the light was fading failed to consider my journey home and how a one- way out situation led me to drive on slippery lanes that  had not been gritted.  (Having arrived there by main road).  I ended up feeling quite scared approaching hills,  finding another car stranded and awaiting a recovery vehicle.  I remember thinking how stupid I had been and that the images I had collected better be worth it.  I hate driving in snow conditions as a rule and a journey of approx 10 minutes took me an hour to return, but I was safe.  Although I thoroughly enjoyed taking photographs in the snow on this day,  I would not put myself in the same situation again.


                                                                             Animals
                                                      shutter 1/160 aperture 8.0 iso 200

As I walked this path I looked back thinking I must take a shot of those animals... the wooden tree remains in the centre, reminded me of something out of a Jurassic Park film.  I liked the way the snow had settled on their backs and surrounding ground ferns,  and the snow path contrasting to the autumn coloured trees cascading overhead.  There was a nice blue sky that day too.  To me this is a lively bright image showing sun light reflections on the snow path and Ansel Adams' Minarets image I also find lively and bright with its reflections.  His Tetons image shows more mood and less light, as does my image below in my opinion.

                                                                       Ice Pools
                                                    shutter 1/200 aperture 10.0 iso 200

Not as moody as Adams' Tetons,  Ice Pools felt more moody as the light was falling.  I like that the sun shows to the left and its reflected light paths going up throughout the image.  My favourite part is the slab of wood in the clear ice middle foreground contrasting to the snow ice part and their curvy patterns. I would have liked a closer image of that area,  had there been more time and space to get in closer ( I already had my zoom out to its full length).  I also like the bits of white cloud, matching the snow ice colour, against the blue sky. Whilst the colours appeal to me I am thinking the image may also work in black and white, which I think would make it look colder and possibly give more mood.


The images below were took on a different day, with lesson learned,  I travelled on foot to take these, with a loaded camera (as described on a previous blog):-

                                                                           Ladders
                                                         shutter 1/85 aperture 4.00 iso 200

I think Ladders may also work in black and white, though I am liking the way snow has a blue colour reflected from the sky.  It looks like you could climb the wooden snow ladders here, the branches so horizontal,  I simply liked the way the snow had thickly collected on them.  I realise there is not much composition to it, but then just liked its simplicity.  I think Ice Pools and Ladders would both work in black and white but it would make Ice Pools feel colder.

                                                                           Hidden Depths
                                                              shutter 1/50 aperture 4.5 iso 200

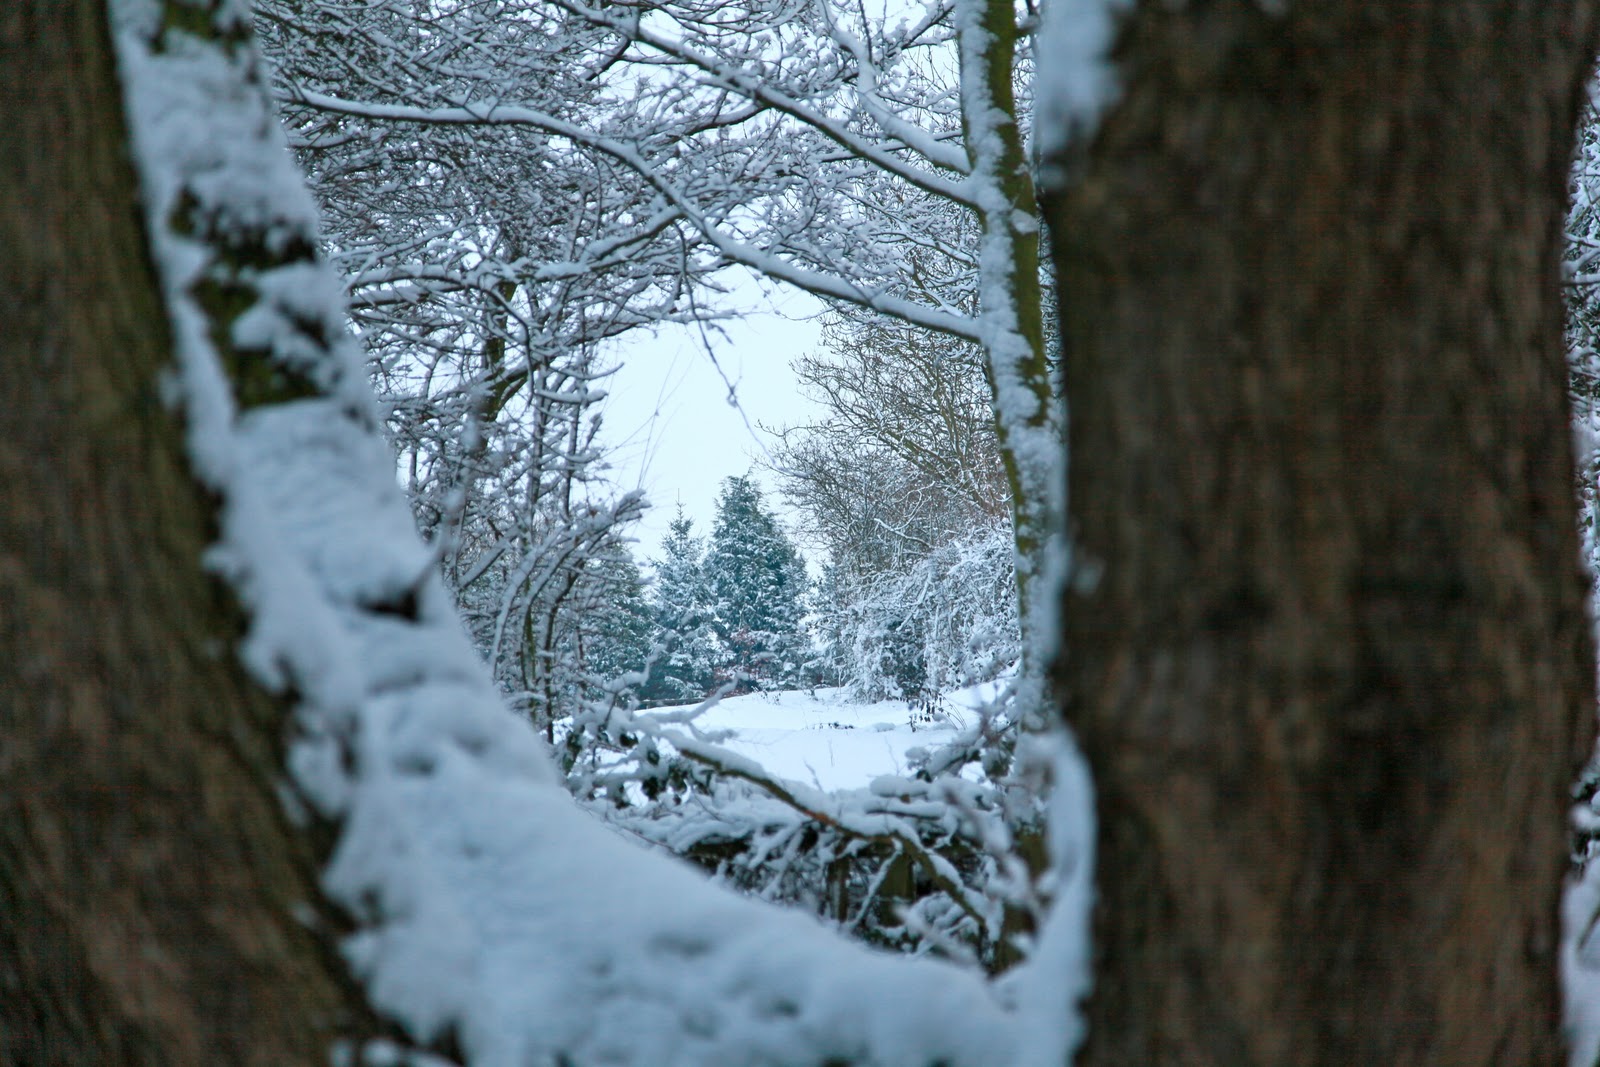
Again I like the thickness of snow collected here but what I loved about this scene was that it contained another small scene beyond...(centre of image);  the open inviting tree trunk displays an attractive scene framed within its core.  I like the criss cross branches above this inner scene,  not too sure about the wooden fence to the left of the full image, and I did move in for a closer shot:-

                                                 shutter 1/85 aperture 4.00 iso 250


I have been out and found light behind a tree.  The light comes from the moon, not the sun, as in Adams's Oak Tree image, and mine is not a full tree shot, but its a start...


                                                                       Branch Light
                                                shutter 0.6 sec aperture 4.00 iso 3200

I like my first attempts at this.  I  went out and took this image at just after 12.00 midnight.  I wanted to capture the light through the tree branches, but I could not get the whole tree in the shot, because there were houses stopping me moving further back (I was nearly in someone's driveway as it is).
 For health and safety reasons I wanted to set up close to the car as possible, I knew that there probably wouldn't be many people around at this time on a freezing cold night, but I wasn't taking any chances and wanted to shoot and pack up to go as soon as I could.  I ran off a few, changing position slightly and height of the tripod.  The moon was hazy coming from back cloud but the colour effects I got on the tree, from a lamp to the left behind me, were a nice surprise... A golden glow, even at this time of night.  Once I had loaded them onto computer for inspection,  I wished I had taken more.
Equipment used:
* Canon EOS 5D Mark II camera with battery
*L series Lens 24-105mm
*SanDisk Extreme CompactFlash card 8 GB
*Tripod

Sunday 19 December 2010

Manipulation- Images

Tonight I saw a nice full moon in the sky driving home and decided if it was still going to be visible when I  arrived home I would set the tripod up and try taking some more shots of it.  I did get some which I quite liked on viewing them, and one in particular gave me an idea for a manipulated image:


                                                                    Rolling Moon
                                                   shutter 1/15 aperture f4.0 iso 3200

To me it looked liked the moon had just rolled down the cloud from the right side, in this image and I thought what if I make some more moons roll down too.  Though the image is quite dark and subdued I liked it, the foreground trees were ok and gave it a frame, but I didn't like the little black circle to the far left of the image, (part of a twig) and set about removing that first:

I first dragged my image over the photoshop icon in the dock of the computer, then clicking on this icon photoshop opened and my image was ready in it to be amended:
 I choose to use the clone tool by clicking on the clone icon in the icons menu to the left of my screen, then I chose a brush from the top icon and selected a number big enough so that the amending circle that appeared was big enough to cover my black circle.  I moved into the image ( command +) to see the black circle easier, then pressed the Alt key and clicked near to it (to give me a similar  colour to cover it with). Then I let go of the Alt and aimed the amending circle over my black circle and started clicking away until it was removed.  Now I had this image:


Now I needed to clone the moon and present it more times up the cloud.  I used the same tecnique as before, taking the cloning tool, using a brush big enough to cover the moon (no 226) and also chose a soft round brush no 5 (again from the top brush box and menu that appears as you select).  I held the clone tool over the moon with the Alt key and placed it further up the cloud, let it go, then clicked onto it again which gave it the brightness.  I decided to add another 3 moons and placed them in little gaps in the cloud, not wanting it to be too straight, but random and tucked in to a spiked up cloud part, as though wedged, but not wedged in, just so that they didn't look too 'sat on top'.
 I think because of the soft brush I chose being so light,  I had to go over them more than once, to gain the brightness I wanted on each one, and because of this it gave a glow effect round the other moons, great I thought I like that;  it looks like they are glowing hot as they roll,  leaving the original one normal.  I was really pleased with the result as I considered it to be my first success with photoshop workings.  The end result is shown below:

                                                                         Moon Balls

Equipment used:
*Canon EOS 5D Mark II camera with battery
*L series Lens 24-105mm
*SanDisk Extreme CompactFlash card 8GB
*Tripod

Thursday 9 December 2010

Research Joe Cornish

  "First, light.  Everything else follows, for light is the language of photography as well as its raw material. As a poet uses words, so a photographer uses light."
                                                                                                          Joe Cornish

Joe Cornish has this written on the back cover of his book entitled First Light, a signed copy I am pleased to have bought at his talk at the college recently. When I found out he was going to be speaking I was very interested to be there as I had already started to research his work from a book I was enjoying, entitled Working The Light. This book was co-written with Charlie Waite, David Ward and Eddie Ephraums,  produced by Charlie Waite's travel photography company, Light & Land ( set up in 1994).

Joe Cornish is one of Britain's most distinguished landscape photographers, with 20 years experience, he is favoured by the National Trust.
I related to how he considers light to be everything in a photograph,  I have recently joined the National Trust and what he said at his talk both inspired and made sense to me.

    "While landscape provides the subject matter, it is light we record and interpret.  Light defines space, reveals texture, sculpts form, controls colour, and above all ignites an emotional response.  The sky is our studio, our theatre, and we must learn to act upon its gifts of light."
                                                                                                           Joe Cornish

His work ranges from images taken from North Yorkshire, where he lives, Scotland, the cornish coast, Colorado, New Zealand and Alaska.  He places much importance on the composition of an image, together with the light and his aim is to get it right in the camera primarily. He likes to use filters where necessary; his ethos being 'looking natural'. He photographs from an upside down view (with the type of camera he uses), saying " that if it looks good upside down it will look great the right way up."

While Joe Cornish likes to have images all in focus, front to back, as most photographers do, he does not believe this is necessary all of the time and quite enjoys some elements being out of focus. He also says he doesn't really follow the rules like the rule of thirds, but tends to go more for what feels and looks right.

 His lens choice range from wide, long, standard and super wide angled, plus a macro; should always be part of a landscape photographers kit, else they miss out on all the finer close details. He believes we should learn to use lenses properly to compress and juxtapose, but to also respond to our internal ideas and what we love.

 When the weather is too difficult for photos, he will use a macro to home in on those detailed images, but he does believe most weather can be photographed, rain, snow and winter is his favourite light time, when he finds the low soft light easier to work with than that of summertime.....he finds green ("the colour of life") hard to photograph.  He loves the snow and states how it still inspires him and the light it brings with it. He takes shots in rain using a filter to darken the sky.  He also uses a hand held spot meter for exposure.

Alot of his work was shot in his own garden, saying " just get out there and practise, practise wherever  and whenever you can and learn the colour of light."  By that he means the way he uses colour casts from the reflection of sunlight  say from cliffs and water pools for instance. He points out how he takes images at all different times of day, not just at sunrise and sunset. Mid afternoon shots are some if his favourites.

The natural world is his main source of inspiration (in keeping with my natural wonders theme), saying how he keeps it simple making the subject do the talking. His work expresses mood, emotion and atmosphere.  He believes human beings and nature are part of the same thing.  He likes to show energy where he can in his images, and likes the vertical (offering more sky and more foreground); for creating a journey through the picture, and states how sky and colour sets the tone and mood of an image.

  John Blakemore was of great inspiration to him and he also mentioned the work of Ansel Adams, his first photographic hero.

Joe Cornish was born in 1958 in Exeter. The Joe Cornish galleries are based in Northallerton, a market town in North Yorkshire, and include Joegraphic, which publishes and distributes his cards and calenders to the retail market.

He studied art at Reading University and that was where he first discovered photography. He is now an experienced workshop leader and has led tours for the past 10 years for Charlie Waite's company. Other photographic companies he works with include Lee Filters, Fujifilm UK, Gatzo and Lowepro.

More Joe Cornish quotes, tips, that I noted at the talk evening:

"Soul: quite simply is a matter of who we are"
"Take time to be with the subject"
"If the foreground isn't a good picture in itself (not interesting), it shouldn't be there"
"See the colour of light, like the borrowed colours from elsewhere"( reflections)
"Good scenes can be found not far from a road" ( we don't always have to carry our kits far)
"Be curious to different viewpoints and new angles. Its part of the photographers job"
"Bad weather is good for photos. The mood of my pictures makes up for the weather loss"
"It is not about finding new landscapes, but seeing the landscape with new eyes" (re-visits)
"Locations: anywhere that inspires you"
"Freeze/thaw icicles are always a unique photo - a once event"

Joe Cornish  has taken risks in pursuit of his passion; he hiked for 2 hours for a high mountain shot in glasgow, got caught in a blizzard and said it was scary.  Another 2 climbers later fell to their deaths at the same place.
 He is fully aware of the dangers of his passion and then at the other end of the scale  I like his lightheartedness (which shows in his titles, or chapters of his work) and the way he still considers landscape photography a recreation or play.

At the end of the evening I got chance to shake his hand and say how I thought him inspirational... which I do,  and his work!

by Joe Cornish

Waterholes Canyon is from his  'Plateauscapes'  section of his website and he describes it as probably his favourite image. Taken with his Ebony 5 x 4in field camera with 72mm lens.   It is vertical too which I now know he likes best. 
 "The cloudy sky reflected in the dark foreground pool help to suggest a hidden world".
This was the first image that struck me in his book.   I like the scene as a whole but the foreground pool looks almost surreal like it has been cut out and placed in afterwards. The depth of field is really good and I love the way it reflects such a broody sky.
 Joe has taken it at a favourite place of his, Zion national park.


by Joe Cornish

     This image is from his ' Local Icons'  section and I love the colour contrasts of the greens and again the sky is just great; lovely cloud formation and colour from the deep blue to the golden sun reflective parts, in keeping with the foreground field. His choice of half and half composition is what he tends to favour over the rule of thirds.  When taking this summer evening shot Joe Cornish was thinking of William Blake's phrase from the hyme Jerusalem... "Englands green and pleasant land" and I couldn't agree with him more.   He took it on his Ebony 5 x 4in field camera with 90mm lens.                                                       

                                                                  by Joe Cornish

His 'Dark Rising Sun' image is taken from his 'Dark Days' section and as he shoots into the sun he is reminded of the allegedly dying words of painter JMW Turner..."The sun is God". As a landscape photographer he thought he had a point. Taken with his Ebony 5 x 4in field camera with 210mm lens.

Though this image is dark I like it for the light reflective parts. To me it looks mysterious and I like  the way the sun is glowing as it breaks through the dark cloud. It is not too obvious where the land ends and the sky starts because it is so dark and again this adds to the interest I think, it makes you want to look closer.

In comparison I have tried to take images of a new moon breaking through dark skies at night as follows:


                                                                        V-moon
                                                    Shutter 0.6 Aperture f4.00 iso 3200

I can see that the clarity is not there in my image and there is not much composition. I was experimenting and because I just happen to be walking outside when I saw the bright moon I grabbed my camera quickly and fired away without any tripod or much thought, just to see if and how the moon would actually show on my camera within the darkness.  As I ran off shots, cloud was covering and uncovering the moon and on alot of images there was the appearance of a double moon, so they were the more blurred ones.  On this you can see it just, within a 'V' lettered expanse of lit cloud. When I cropped in,  I didn't like it,  as it then showed its unclearness more clearly.
 I would like to try more of these in future, hoping for better results.
Equipment used:
*Canon EOS 5D Mark II camera with battery
*L series Lens 24-105mm
*SanDisk Extreme CompactFlash 8GB


                                                                   by Joe Cornish
                                                                                                                          
This is a lovely image too.  It entices me.  'Adventure Bay' taken from his 'Beach Ball' section.  Joe Cornish liked the way a broken tree was there on the beach scene "Its dynamic shape and surface textures made it a compelling subject for me as I explored here at dawn."  He took this image again with his Ebony 5 x 4in field camera and 90mm lens. I like the way some other trees are incorporated in the background, with mountains in the distance, I find it very warm and inviting.
I would like to compare it to my 'Alive' tree image purely from a dynamic shape of tree point of view, though I don't think I dare and the composition of mine is nothing to the grandness of this beautiful scene.

Wednesday 1 December 2010

Photograms

In class we had a go in the dark room at producing some Photograms after watching a slide show on the subject.  This is where a machine that acts abit like the aperture of a camera takes an image of an object/objects on special photographic paper.  This paper is then treated in liquid solutions to produce and develop the image so that we can see it.

What we did:
In the room there were items we could use for the images so I chose a soft toy (which for title sake I will call funny bunny) a feather, a wicker type ball, some lace and a 'woman' cut out ( stencil) image.

First we took a sample strip of the photographic paper, placed our object on top ie. funny bunny and put it under the machine making sure that the light that shone down on the paper (when turned on) covered it effectively, amending any controls at the top base unit to ensure that. We set the timer for 3 seconds and placed a piece of card over the object so that just a portion of it showed, and pressed the start button.

The machine lit up the paper, taking an image for 3 seconds then switched off its light. Moving the card to show more of the object we set the timer for 6 seconds and pressed the start button. The machine lit another part of the object too (taking a shot) for this longer time then switched off. We continued to set the timer for 9 and 12 seconds moving the card along respectively. Then we  dipped the sample paper into the developing fluid for 2 minutes and the setting fluid and took it outside the dark room to view in the light.. We judged how we preferred the image ie. developed after 3, 6, 9  or 12 seconds and continued to produce an image of this same object for the selected time period on an A4 size piece of photographic paper:

Once the image had been taken on the machine we dipped the paper into the developing liquid  (tray 1) and swished the tray up and down making sure the paper was fully covered with the liquid for 2 minutes.
We took the paper out using plastic tongs and placed it into tray 2 (the setting liquid) for 1 minute, then taking it out we placed it into tray 3 (the fixing liquid) for 5 minutes. After this stage we removed the paper and placed it into a sink of running cold water which we left for 20 minutes.

We continued this process using different objects and light up times. We used more than one object on the same piece of paper to compare the images with patterns of say lace strips, feathers and different materials. We could also place one object in the base of the machine (acting abit like a filter) at the top, and one on the paper at the bottom and see what effects that achieved.

Another way we developed the picture was by spraying developing solution directly onto the image paper and using a tool to spread it around, bringing out parts of the image more heavier in one part than another. Then the paper would be put into trays 2 and 3 liquids to set and fix, and finally into the sink.

Later we went back into the dark room, removed  all the images from the sink and rolled them between a heated roller machine to dry the pictures.  We found the whole process fun and produced the following:


                                  Funny bunny alone image was taken for  4 seconds
                                  Funny bunny with feather was taken for  6 seconds

                                                  Lady image was taken for 3 second

                                                                  2 sample strips used

                                          The left image shows funny bunny sprayed developed. You tinker with it (spread it around) until you are happy with the results before setting and fixing.  The right image was where I placed a strip of ribbon in the top of the machine (acting like a filter) and a type of wicker ball on the bottom of the machine under the light which I set on a 13 second timer.

Tripod Field Trips and Preparation

 My preparation, prior to first Tripod field trip:
  I had prepared by surveying  the location, on a previous trip, with camera only (as described in a previous blog) on foot, and at that time deciding where I would return to, to use more equipment... I had noted where I would park, in order that I would not be walking too far from the car carrying lots of equipment,  because of the weight, and from a security point of view, going out alone.

 At home I had assembled the tripod and placed the camera on top, so that I would know how to assemble it properly and to give me some idea of its height levels, whilst looking through the viewfinder of the camera. I left the little part of the tripod that attaches to the underneath of the camera (it may be called a bridge, not sure), attached to the camera.  In previous weeks and since starting the college course I had browsed photographic magazines looking for tips on how to use different equipment when taking landscape pictures. During this course we have learned about different  types of lenses and filters available for cameras (see 'Lenses and Filters' blog).

Then, same day preparation for Tripod field trip:
 I took a Cannon EOS 5D Mark II camera with installed battery, and a L series 24-105mm Lens, (my lens has a UV filter which I keep permanently attached for protection), a tripod, a new SanDisk Ultra CompactFlash card 8GB, 30MB/s,  a ND graduating filter, filter holder, and shutter release attachment in my camera bag together with a plastic bag.   I also carried a near full Extreme CompactFlash card 8GB, 60MB/s and a lens cleaning cloth, just in case.
On reaching my destination it wasn't long before I located a dead tree which I had thought worthy of some picture time.

There was a handy bench nearby where I placed the camera bag whilst I took the tripod out its holder and began assembly, ie stretching its legs out and locking them in place at each of its 6 locking positions. I was on a hill so it was fun trying to get the legs steady in accordance with the 2 spirit level indicators on the tripod. (The spirit levels would help the horizon be straight in my images).  When I was happy, taking the camera from its bag, I attached it on top of the tripod, releasing the clip and locking it in place by 'the bridge' attachment. I attached the shutter release chord to the camera and removed the cap off the lens.

I could now experiment looking through the viewfinder, using the camera controls, to achieve the view and composition I liked and reseting the tripod legs individually where necessary. The tripod has a long handle on it so I could turn its head around and up and down at ease, though I found while I liked this aspect, it can also get in the way sometimes.  After taking some images in Program and Aperture Priority modes I also experimented with exposure level compensation in Manual mode just to see the difference. Though I may have adjusted this the wrong way, Im not sure.

Next I tried to take images using an ND filter to see its affect on the bright sky:  I fastened the filter attachment to the front of the camera and put the filter inside it in the middle section.  I played with the movement of the filter while I took some images, looking at the display momentarily, after taking an image, to give me some idea of how they were turning out. I had learned alittle of the effects this type of filter can have on images, and how there may be some distortion at the edges of the image, so I needed to play around with it, and maybe crop in later.

Picking up the tripod by its handle whilst making sure the camera was still steady on top, I would move to different positions to take more images, again after adjusting the tripod feet and camera controls. When I wanted to test the tripod at its lowest height, I removed the camera from the top, placed it in its bag, then lowered the tripod legs so small that I would need to scramble on the floor with my knees to be low enough for the angle, and this is when I used the plastic bag, to kneel on. I placed the camera on top at this low level to take more images.

After some time  I moved onto another tree position (a live one this time) to take shots without the use of the filter and its holder.

Before I had set out I had thought I would probably go to this location for approximately one to one and half hours initially. After 3 hours I packed up and went home.

I was eager to have another attempt at a second tripod field trip and later that same week returned to the same location with the same kit (minus the filter, filter holder and plastic bag).  I parked at a different spot to take different views, at standing level only.

I viewed both lots of  images later on the computer for closer inspection and these 2 were my best, in my opinion.  I had taken both on my first visit, one using the ND filter and one without:

                                                                           Alive
                                                     Shutter 1/250 Aperture 11 iso 200

To me this tree looked alive as it lifts its hat to show its hair to the sun,  looking up to the heavens with arms outstretched to the oncoming cloud. I can almost see its eyes and nose from the side. A minimal amount of colour works well I feel and I like the way its reddish head also reflects in small arm parts. Abstract like with a statue pose shows shape and texture. I am pleased with it on the whole. It was taken with a tripod as stated above, without the filter.


                                                          Shutter 1/160 aperture 8 iso 200

This is a full image shot using the tripod and a graduated ND (neutral density) filter showing more colour and contrast. I know it should not be aperant that a filter has been used and you can obviously see it here, but I liked the arched top colours effect, and the way the ground branches reflect in its sky.  To me it appears more interesting, a different type of picture.  It  also shows more shadows however, though again this adds to making it a more moody.

What I learned:
Later on viewing the images I could see how a ND filter made a difference to the exposure and colour of an image. The filter holder I used (borrowed from a friend) was not the right size for my type of camera (not wide enough) and therefore the image showed the presence of the filter more at the edges.  I  would need to get my own, larger version, when I  bought a filter. I also learned  how I need to allow plenty of time when going out with the tripod/ more equipment.